Kittens and Butterflies Birthday Party

“I want my birthday party to be kitty-themed this year”, declared my almost-six year old daughter… “But wait – I want it with butterflies too!”. Initially I was a little daunted by this unique double-theme combination, but Ellie’s birthday parties are always my most fun and fulfilling creative project of the year, and I was determined to see how I could pull this off.

My first step was to identify the activities I could do to entertain her friends, and in an initial brainstorm I joked with my husband about bringing in some real kittens for the kids to adopt (which would probably be every kid’s dream party and every parent’s worst nightmare party!)… but it led to the idea of having a Beanie Boo “kitten adoption center”. The kids could choose their own kitty from a forest-themed display, flanked by butterflies, and then go through a number of stations to personalize and adopt their new toy.

When Ellie’s friends arrived at the party, the first thing they could do was go to the welcome station to pick out their own cat ear headband.

DIY wooden welcome sign with 3D butterflies in rainbow colors
3D butterflies glued onto wooden sign in purples and blues
Welcome sign for kitten adoption party with car ear headbands
DIY wooden welcome with with butterflies in rainbow colors

I ordered a good selection of cat beanie boos for the forest-like adoption center. They sat on sections of cut wood (actually taken from a friend’s tree that had to be cut down), with three central pillars covered in faux hedging.

070_2R0A9445StudioCarrePhotographieBEST
Stuffed animal toy adoption display

I made the sign using cut vinyl from my Cricut and hot glued on some silk flowers.

Beanie baby toy kitten adoption center sign for child’s birthday party
Beanie boo kitten wearing a butterfly headband
Toy kitten adoption center for themed party
Kitten adoption stuffed animal display

After naming their kitty, Ellie’s friends could create their own name tag, using cheap key-tags I found at Staples. I created a selection of ribbon collars, using stick-on Velcro to fasten them, that the kids could “bling out” with stick-on crystal tape.

The next station allowed the kids to decorate a cat food bowl (AKA a paper ice cream cup) with washi tape, which they could fill with Swedish fish to feed their kitty.

The next station was my personal favorite – the “glitter box” filled with glitter confetti, three pink sparkly poops made out of modelling clay, and a shovel to clean up after their pet! This station was a huge hit, with a number of kids asking to take the poop home with them!

Litter box for stuffed animal toy beanie baby adoption center party

Finally, they could pick out some hair bows for their kitties before filling out their pet adoption certificate.

Here is a video tour of the adoption center to help bring it to life:

To pull in the butterfly theme for activities, I planned a mass butterfly release with a combination of painted lady and monarch butterflies. The kids also each got an envelope with a live butterfly inside to open up, and it was pretty magical to see their faces light up as these beautiful creatures emerged from their cool hideouts to bask in the sunshine on the kids’ hands for a while before flying off into the breeze.

Girl holding a monarch butterfly for a kittens and butterflies themed party
Girl holding monarch butterfly after release
Girl holding monarch butterfly for themed birthday party butterfly release

Ellie picked the color theme for the party (pink, purple and white – not so unique for a 5 year old, but that’s ok!) and the decorations for the party relied heavily on artificial silk flowers, which I mostly sourced from the clearance aisle at Michaels. I took a basic metal archway and wrapped it with flower garlands, while adding some wisteria to dangle down from the top.

Purple pink and white flower arch for birthday party decoration

I also created a pink-to-white ombre artificial flower wall to display in the garden as a photo backdrop, which proved particularly popular with the live butterflies!

Pink and white ombré flower wall for party decorations DIY

For the cake and dessert table, I used another flower wall as a backdrop and cut out some paper butterflies using my Cricut Maker machine to add to the scene, along with some tulle curtains to soften the look.

The three-flavored birthday cake was decorated with a fondant cat with a butterfly on its head, and edible sugar butterflies were added to additional cupcakes and desserts. Above the cake I displayed two bell jar decorations which included fake butterflies, flowers, moss and rocks.

Cake dessert table for butterflies and kittens birthday party with flowers
Butterflies and kittens themed birthday cake in pink and white with flower decorations
Butterflies and flowers inside bell jar party decoration
Pink frosted cupcakes with purple butterfly decorations
Pink and white ombré birthday cake with butterflies and kittens decorations
White beanie boo kitten stuffed animal with butterfly bell jar decoration for kittens and butterflies party

Another focal point was a 4-foot tall Ferris wheel which I decorated with flowers and magnetic butterflies. This ferris wheel was an unexpected find at Home Goods and was originally a gray metal color, but I painted it with a white chalkboard paint and added aging wax to give it a more antique feel.

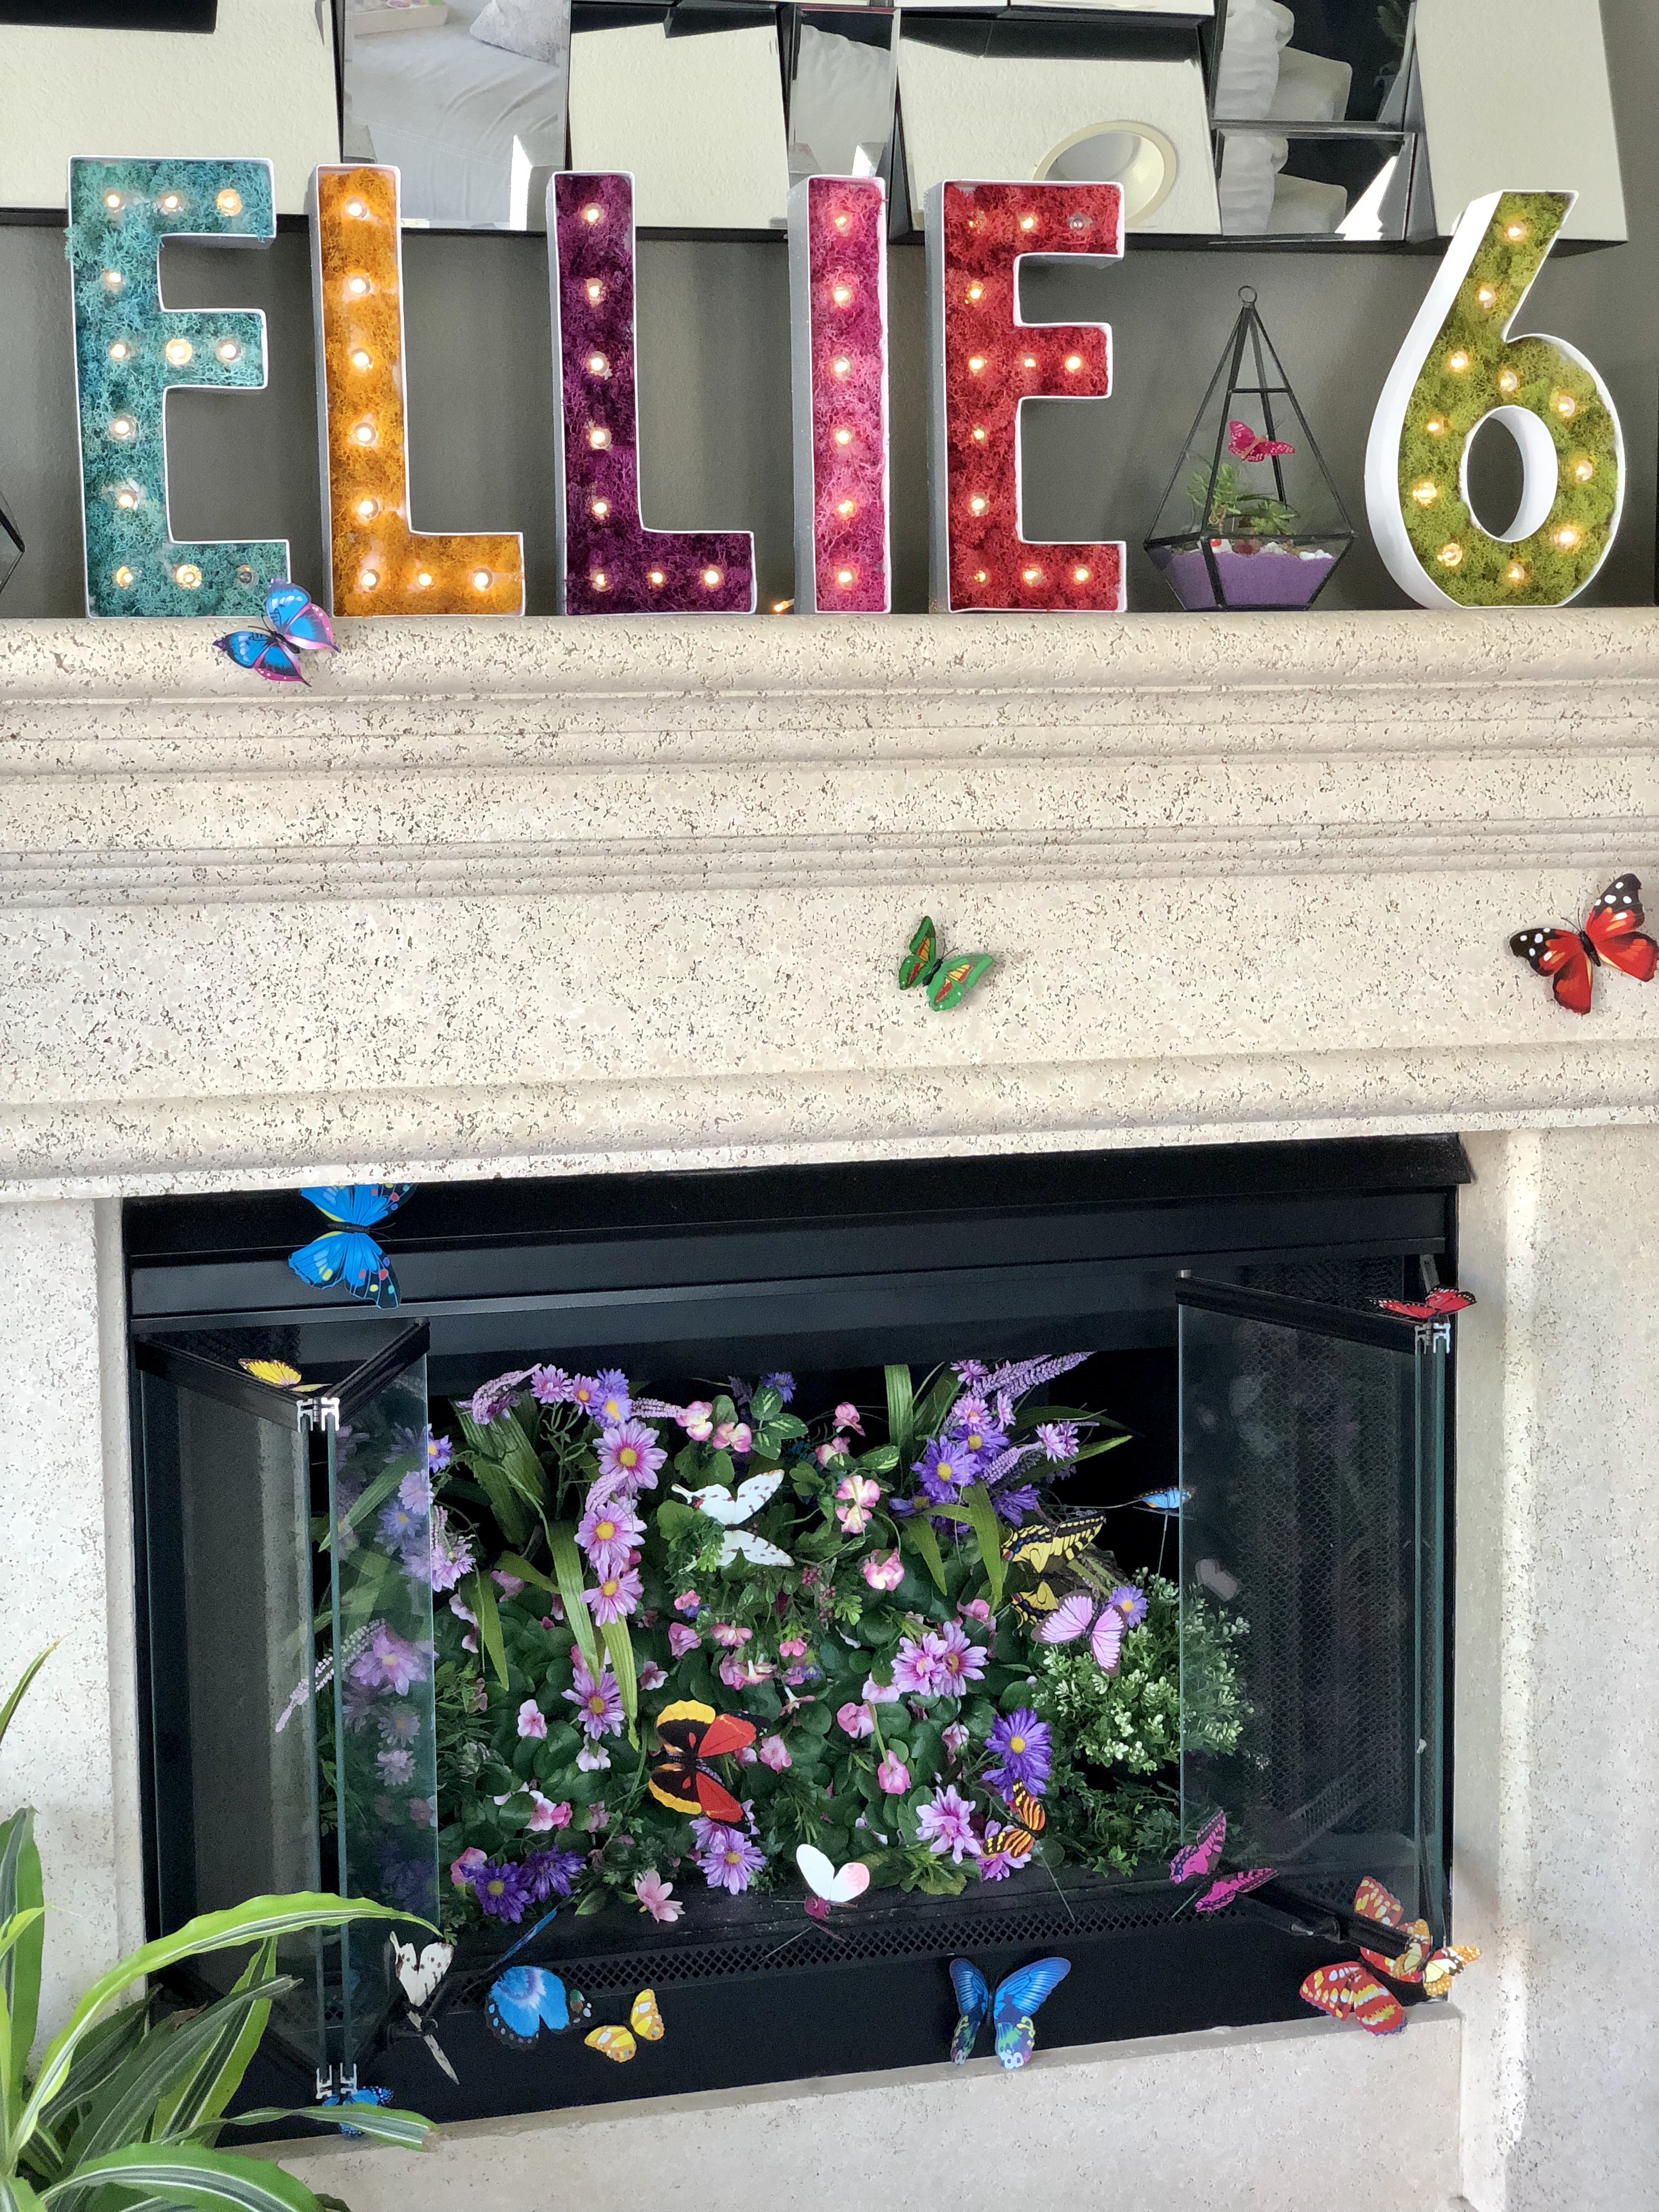
I re-used the moss marquee letters I had made for Ellie’s 5th birthday party to go above the fireplace. My Mum had the brilliant idea of having flowers and butterflies come out of the fireplace, which I thought added a cute, whimsical touch. I also displayed a birdcage that I decorated with flowers and butterflies.

After everyone jumped in the pool for a swim and had some balloons twisted for them (it’s a 6-year old birthday party after all!), guests got to take home their adopted kitty as well as their “meowgical cat ear” headbands that they had selected on arrival. As they were leaving I overheard one child say “Ellie’s parties are so magical, this is the one place where no kid could ever be sad”. Between this comment and the smiles on everyone’s faces, I was definitely a happy camper.

Thank you to Studio Carre for the beautiful photos of this event!

Advertisement

Make a carousel horse from a radio flyer jumpy toy horse

Tutorial on how to make white carousel horse decoration from kids jumpy toy

Carousel horses can be beautiful decorations for children’s rooms and parties, but buying one will set you back a cool grand or two. However, if you are a little crafty and up for a challenge, you can totally make one yourself – all you need is one of these plastic jumpy/rocking toys:

We were lucky as we were gifted one of these from a neighbor whose daughter had outgrown it. Ellie played on it a bit, but it was one of those things that seemed like a nicer idea than it actually was, as it took up such a huge space in her playroom, and after the initial excitement wore off, it just started gathering dust. So when a friend of mine started planning a carousel themed 1st birthday party for her adorable little girl, I was so excited to take this guy off his huge stand and refurbish him into a stunning carousel horse.

The first step was to take him apart and de-hair him. I dismantled his legs from his body, then managed to rip off his mane. Finally I cut off his tail so there was just a little nub left. Here he is prior to the hair removal process:

I recruited the assistance of my engineer husband to figure out how to mount him on a pole. I wish I could report first-hand on how that process went, but essentially I left him alone in the garage for an hour or so and when I came back it was successfully mounted. I wish you the same magical success with this step! He told me that under the horse there is a compartment for a round speaker (which played horse sounds) that he removed and then used a circle cutter (aka a large drill blade) to cut a hole in that area on the bottom and the top of the horse. He slid the pole through the hole in the horse, and then added a thick metal pin through the pole to hold the weight of the horse in that spot. And then he added copious amounts of glue at the top and the bottom openings to hold the horse tightly in place on the pole. Here is a close-up of the mounting area underneath – not pretty, but it gets the job done:

I used an umbrella base to mount the pole to get it ready for painting.

I got my horsey ready for spray painting by covering up his eyes with masking tape, as I wanted to keep the eyes the same (and I was worried if I had to paint the eyes myself, I might make them look super creepy). I gave him one layer of primer followed by two coatings of white paint. I used a satin paint and primer in one.

After the white coat had dried, I started with the accent colors. The color scheme for the party was light teal, pink and gold, so I used these colors to start painting the seat, the saddle and the reigns. I did two or three coatings of each color paint using regular acrylic craft paint.

I wanted to hide some of the ugly gap line between the body and the legs, as well as the holes where the jumpy foot stands and handle bars used to be, so I chose to hot glue silk flowers in those areas. I started with a few flowers and then just kept going to town until it felt sufficiently adorned to mask some of the lines and distract the eye from what remained.

I made the mane and the tail using white faux fur fabric which I rolled into a tube shape and tacked together. I simply glued the mane in place along the seam line with hot glue, and then I wrapped the tail around the small nub area of the former tail and glued it on. I added trim around the collar and gold rope for the reigns, and then added pearls and crystals in places for a little something extra. (Ignore the Christmas trees in some of the photos – that’s what you get for working on craft projects in December!).

White carousel horse made from children’s jumpy toy radio flyer with Christmas tree

The last step was to wind white ribbon around the pole and a pom pom at the top, and voila – the horsey was done and ready for prime time!

White carousel horse made from kids radio flyer jumpy toy white
DIY decoration white carousel horse from jumpy toy

Ellie got first dibs at trying it out in our back yard:

To make the horse “safe” to hold a child’s weight, we added heavy rocks to the umbrella base (which I had covered with silk flowers to look pretty) and clamped the pole really tightly into the base. If I was planning on using this for a bunch of kids to jump up on I would have to come up with a more stable long-term solution, but this worked just fine for a few smaller kids with adult supervision. I transported the horse over to my friend’s house for the birthday party (it just about fit in the trunk of the car with the pole sticking up all the way to the windscreen!) and they used it in the entryway for the party.

We moved it to the garden later for some adorable photos with the cutest birthday girl!

DIY carousel horse made out of plastic jumpy toy horse

I was really pleased with how this project worked out and my horsey friend is actually on display in my office now (and hopefully he gets to be reused at some point in the future). In total I probably spent around $50 bucks on this transformation, and I think it was worth every penny!

DIY Game of Thrones Dragon Eggs

I used to be one of those smug people who could claim “Oh, I’ve never actually seen a single episode of Game of Thrones” as if somehow there was some superiority that came along with not being sucked into such a popular show. I honestly couldn’t care less about whether Jon Snow was alive or dead or back to life again. Then one of my husband’s friends convinced us to at least give one episode a try… and the rest of our summer of 2017 was history as we binge watched 67 episodes over a few weeks (yes, that’s 67 hours we had to fit in between our jobs, parenting a 4 year old and occasionally sleeping!). We went on vacation in the middle of our binge and to our delight our daughter decided she wanted to spend hours on end at the kids club – so instead of grabbing a cocktail and chilling by the pool like normal parents who suddenly are granted some freedom, we would just go back to our room and stare at our laptop for hours on end.

Anyway, needless to say I am now a huge Game of Thrones fan, bordering on nerd who reads too many fan theory articles about what may happen in the final season.

The cool thing about Game of Thrones is that there is a lot of inspiration for craft projects. Last year we hosted a small season finale party and I made an Iron Throne as well as one dragon egg. This year I plan on throwing more parties to enjoy the final season with other GOT-nerd friends, so I decided to go whole hog on some more decorations, including making two more eggs to get the full set.

Making dragon eggs is actually ridiculously easy, if not tedious. The worst part about it is driving back to the craft store for a second, then third, then fourth time, when you realize yet again you still don’t have enough push pins/thumb tacks (AKA drawing pins for my fellow Brits).

Supplies are pretty simple:

  • Craft foam egg
  • Metal push pins – I estimate you will need about 600 (!!!) for each egg if your foam egg is the same size as mine
  • Craft paint
  • Natural sea sponge

I found it easiest to start at the bottom of the egg, and you simply push the pins into the foam, overlapping each slightly as you move from the left to the right. I basically went around the egg in circles, overlapping each layer slightly as well so you never see a whole pin exposed. (Like me, you may have grand plans of following a lovely clean spiral all the way up the egg but that likely won’t work out. It will be a bit of a hodge podge, but that’s ok – a little randomness in the lines of pins and the degree of overlap actually makes it look a little more natural.)

Once all the pins are in, I recommend coating in a thick layer of mod podge. This helps keep the pins in place – which will be particularly helpful when you paint them, as the last thing you want is for the pins to spin around in place after your finished and start exposing areas that were not painted.

After that’s dry, it’s time to paint. An ombre effect looks the most realistic like the eggs from the show (and also pretty cool) so I found it easiest to find three-to-four different colors ranging from dark to light and paint them on thickly in rough bands on the top, middle and bottom of the egg. Then you can grab a little bit of the sea sponge and use the lighter/darker shades to create a stipple effect on the other areas. This helps blend the colors together as well as giving it a more natural egg effect. I used a metallic or pearl finish paint for at least one of the colors on each of the eggs to help catch the light and give it some more dimension.

I used a coffee mug to hold the egg upright (and then once it was dry I’d flip it over to the do the other side). I’d keep the paint from drying out by covering the paper plate I was using to mix colors with some cling wrap.

Using a mug to hold the egg in place

And that’s about it. This is about as easy as craft projects get – the only tricky thing is mastering the ombre effect and not obsessing over it and doing 7 different coats like I did. Entirely unnecessary. To display the eggs and keep them stable I rested them on upside-down juice bottle lids, and then ultimately for the party I plan to nestle them among straw.

Warning – The only problem you may encounter is that if you have a child in the age range that still believes in Santa, that they will also likely believe there is a real baby dragon inside each of the eggs. Ellie was so excited when she saw my first egg from 18 months ago and has talked about “her dragon” ever since on a surprisingly regular basis. She made a cozy for it to keep it warm, checks on it frequently and shows it off to her friends when we have play dates. Apparently when it hatches she is going to have it fly her to school every day. So when I made the two new eggs, I worked on them when she wasn’t at home so I wouldn’t spoil her fantasy… and when she saw the two new additions she was super excited that now there will be a dragon for each of us so we can go out riding together as a family. Ahhh, to be a kid again and to get so excited about silly dragon fantasy stories… 😉